
A professionally designed logo is a powerful branding asset that can leave a lasting impression on your website visitors. Research shows that a well-designed logo can boost consumer trust in a brand by an impressive 75%.
But the question most people ask is – how do you add a logo into your Divi website? What are the ideal logo dimensions for a Divi website, and how do you customize it?
In this Divi logo guide, we’ll address all these question and more, covering everything from how to add a perfect logo to customizing it through code snippets.
Let’s begin.
Recommended Divi Logo Dimensions
For Divi websites, Elegant Themes, the creator of Divi Theme, recommends a logo size ranging between 250×100 to 250×150 pixels. However, this can vary based on personal preference and logo design.
For example, the Divi theme’s default logo size is 93×43 pixels, and Divi layouts typically feature logos between 160×50 and 225×100 pixels.
This means you have some flexibility when choosing a logo size for your Divi website.
Changing Logo Size via Divi Image Module Preset
If you are not sure about the perfect logo size, Divi provides an easy way of choosing one through the image module presets. Here’s how:
- Navigate to the theme builder and edit the global header.
- Add an image module where you want the logo to appear.
- Click on ‘Preset: Default’ to access the logo size options.
- Finally, use the presets to style and position the logo accordingly.
Recommended Divi Logo File Format
The recommended file format for Divi logos is PNG, as PNG files retain their quality even after compression. You can scale up this format without interfering with the quality. Also, PNGs have a transparent background, making them perfect for websites and digital spaces.
Alternatively, you can consider using the SVG format as a second option. SVG logos are vector graphics, so they can be scaled up and down without losing resolution, ensuring they always look sharp and professional, regardless of size.
The only problem is, WordPress does not by default support SVG files.
You would have to enable your WordPress website to start supporting SVG files either with the help of a plugin or with some code.
Pro Tip: How to Add SVG Image Files in Divi
As a third option, you can use the JPG format. However, this format is not recommend as it tends to lose quality when compressed. When scaled up, it may appear pixelated, compromising the logo’s visual appeal.
Apart from these three formats, you can explore other acceptable options like PSD, JPEG, GIF, etc.
Divi Logo Guide: Uploading, Hiding & Resetting Divi Logo
You can easily upload, remove, and hide your Divi logo within a few seconds using the Divi theme options.
Uploading Your Logo To upload a logo for your Divi website, follow these steps:
Go to the WordPress dashboard menu and click on Divi > Theme Options > General > General tab.
You will see the Logo field here.
Click the “Upload” button to select and upload your logo image into your media library.

Click on “Set As Logo”, and your logo URL will be added to the options field.
Check the result on the live site.
Resetting Your Logo
To reset your logo from the Divi website, simply go to Divi > Theme Options > General > General tab and click on the ‘RESET’ button.
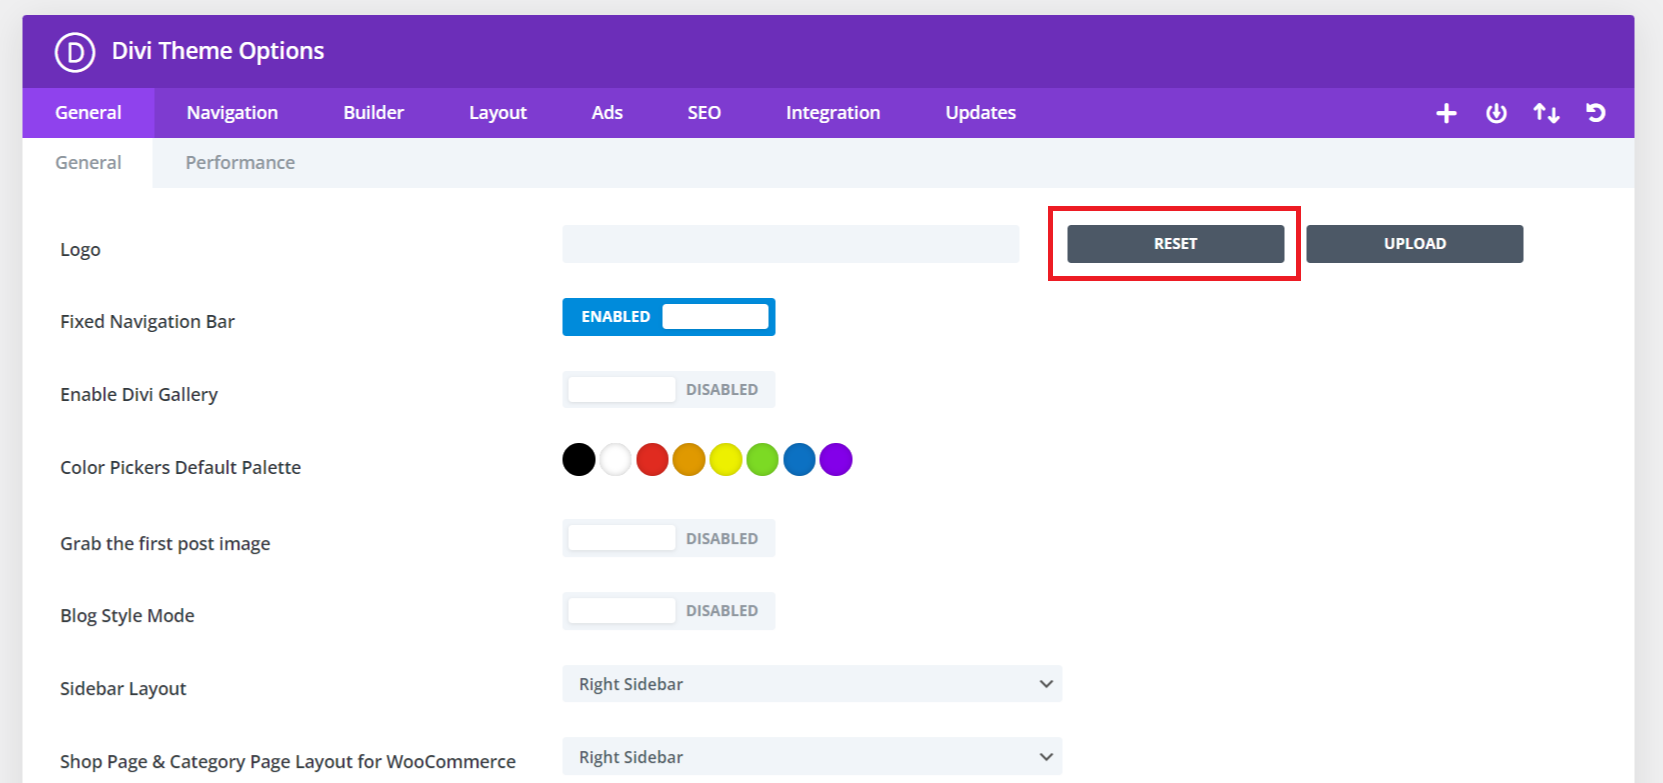
This will permanently remove the logo from the website.
Hiding Your Logo
To hide the logo, go to the Divi > Theme Customizer > Header & Navigation > Primary Menu Bar and click ‘HIDE LOGO IMAGE.’
This process will only hide your logo from the fixed header. When you scroll down, the logo will reappear.
To permanently hide the logo, go to Divi > Theme Customizer > Header & Navigation> Fixed Navigation Settings and check the “HIDE LOGO IMAGE.”
Once done, don’t forget to hit the “Publish” button.
That’s how you can successfully hide the Divi logo from the header.
Adding a Favicon in Divi
To add a favicon, go to Divi > Theme Customizer > General Settings > Site Identity and upload your icon by clicking on ‘Select Site Icon.’
Ideal Favicon Size While there is no standard size for favicons, WordPress recommends using an image that is at least 512×512 pixels and square in shape.
If you choose an image larger than 512×512, WordPress will prompt you to crop it, and it will automatically be converted to 512×512 pixels.
When the favicon is displayed in the browser or other locations, it will appear as 16×16 pixels. For better quality, favicons are also displayed as 32×32 and 48×48 pixels. The higher pixel count favicons provide enough detail for 2x scaling.
Customizing the Logo Using the Theme Customizer
The Divi theme customizer offers options to edit your Divi website logo in various ways.
Changing the Logo Size To increase or decrease the logo size, go to Theme Customizer > Header & Navigation > Primary Menu Bar > Logo Max Height.
By adjusting the “LOGO MAX HEIGHT” from 0-100 pixels, the size of the logo will increase or decrease. However, keep in mind that you need to match the logo size with the menu height.
Changing the Logo Placement To change the placement of the logo, go to the Divi “Theme Customizer” and navigate to Header & Navigation > Header Format > Header Style.
There you can see five different header style options by clicking the dropdown menu.
Among these five options, three of them impact the logo placement:
- Default: Your logo is displayed on the left side of the main header, as usual.
- Centered: Choosing this option places your logo in the middle.
- Centered Inline Logo: Keeps your logo in line with the menu items, standing tall at the center.
The remaining two options do not affect the logo placement; they only modify the header style.
Creating an Overlapping Logo
Instead of displaying the logo in the traditional header menu, you can position it below the header area, creating an overlapping effect.
To add an overlapping logo effect, you need to add a code snippet to the custom CSS tab in the Divi theme options. Head to your WordPress dashboard and go to Divi > Theme Options > General > Custom CSS. Paste in the following code, and hit “Save Changes.”
Overlapping logo code for desktop:
@media (min-width: 981px) {
    #logo {
        position: absolute;
        max-height: 350%;
        margin-top: 15px;
    }
}
Overlapping logo code for tablet & mobile:
@media (max-width: 980px) {
    #logo {
        position: absolute;
        max-height: 200%;
        margin-top: 15px;
    }
}
Note: The “min-width”, “max-height”, and “margin-top” are variables that affect the logo size. You can tweak these to get the appropriate logo size based on your preferences.
Preventing Logo Shrinking
After Scrolling By default, the Divi header shrinks as you scroll, showing a smaller version. However, if you prefer to prevent this behavior, follow these steps:
- Go to Divi > Theme Customizer > Header & Navigation > Primary Menu Bar > Menu Height.
- Note the value assigned to the “Menu Height.”
- Navigate to Divi > Theme Customizer > Header & Navigation > Fixed Navigation Settings > Fixed Menu Height.
- Set the exact value that was in the “Menu Height.”
For example, if your primary menu header is 60 pixels, then your fixed header menu must be 60 pixels as well.
Changing the Divi Logo on Scroll With Divi, you can display two logos on your website: one for the fixed header and another for the scrolling state.
To use different logos on your Divi website, follow these steps:
- To upload the second logo, go to the WordPress dashboard > Media > Add New Media File.
- Once uploaded, click on Media > library, click on the logo and copy the URL location.
- Then add the following CSS code into Divi > Theme Options > Custom CSS:
.et-fixed-header img#logo {
    content: url(File_URL_HERE);
}
- Next, add your copied URL (Logo image “File URL”) in the “url” part of the code. This image will be the logo when the user scrolls.
Making the Logo Responsive for Mobile Devices
Ensuring the logo is responsive for mobile devices is crucial because it directly impacts the user experience.
Changing the Logo Size on Smaller Devices
To change the logo size for smaller devices, we need to add custom CSS to override the main style.CSS file that controls the logo for the mobile version of the website.
To make the logo responsive for mobile devices, go to the WordPress Dashboard > Divi > Theme Options > General > Custom CSS. Then paste the following CSS code:
@media only screen and (max-width: 767px) {
    body header img#logo {
        max-width: 80%!important;
        max-height: 80%!important;
        height: auto!important;
        width: auto!important;
    }
}
This code snippet will only work for mobile devices.
Now, to increase the logo size on tablets, insert the following code:
@media only screen and (max-width: 980px) {
    body header img#logo {
        max-width: 80%!important;
        max-height: 80%!important;
        height: auto!important;
        width: auto!important;
    }
}
Note: You can change the “max-width” pixel value according to your devices. The “max-width” and “max-height” percentage can also be adjusted based on your desired logo size.
Displaying a Different Logo on Smaller Devices
To display a different logo on smaller devices:
- Upload your mobile logo image to your media library. Once it’s there, click on the image, and copy the “File URL.”
- Head back to your WordPress Dashboard and follow this path: Divi > Theme Options > General > Custom CSS.
- In the custom CSS box, paste the following code:
@media only screen and (max-width: 981px) {
    #logo {
        content: url(File_URL_HERE);
    }
}
Note:
- Replace “File_URL_HERE” with the image URL you copied earlier.
- Check your website on mobile to confirm it shows a different logo.
Conclusion
This Divi logo guide covers every logo-related topic you might encounter while working with Divi. By now, you should have all your questions answered regarding uploading, customizing, and optimizing your logo for various devices.
If you found this ‘Divi Logo Guide’ helpful, please share it with your friends. If you have any further questions or need clarification, feel free to leave a comment.
0 Comments