

In this tutorial, I will show you how to reveal hidden rows when hovering over image modules in Divi using a few lines of CSS and jQuery.
Adding the sections, rows, and columns.
It is important to note that this function does not work well on mobile, and therefore, you will have to create a section for desktop and another for mobile.
The desktop version
Once you have created a section, open up the settings, and go to the advanced tab to disable visibility on phones and tablets.
Now, create a row with as many columns as you may need. In our demo, we use 5 columns. Add an image module to each column and add an image to each module. 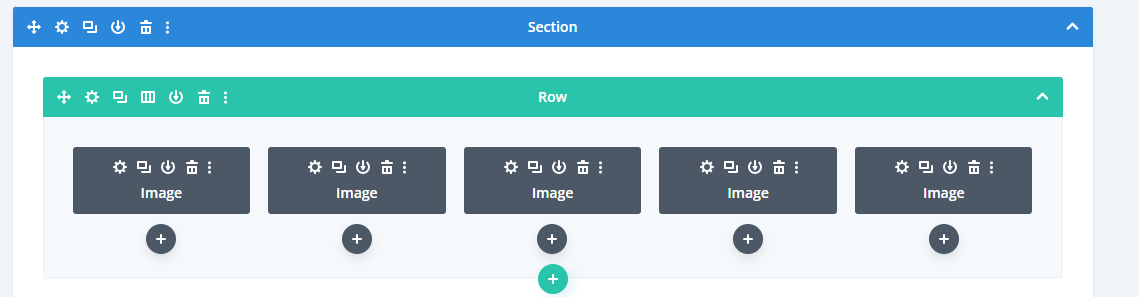 In the first image module, open up the settings then go to the advanced tab. Then in the CSS & Classes, we’ll add two classes. We won’t have to add a comma to separate the two classes. Just copy and paste as is: db_image_1 first For the rest of the image modules, you will only need to add one class. Each image class will be assigned a unique number. For example, we shall assign the second image module the CSS class: db_image_2 Do the same for the remaining image modules, 3, 4, and 5. db_image_3 db_image_4 db_image_5 Once you have designed your image modules to your satisfaction, you can now move to the next step.
Adding the hidden rows that will be revealed when a particular image is hovered over
In this tutorial, we use 5 rows with 2 columns and two modules each. You can use as many rows that have as many columns and modules as you want. Just make sure that the number of rows equal the number of columns in the first step. In our demo, we use two columns and the following modules:
- Image
- Text
- Social Media Follow
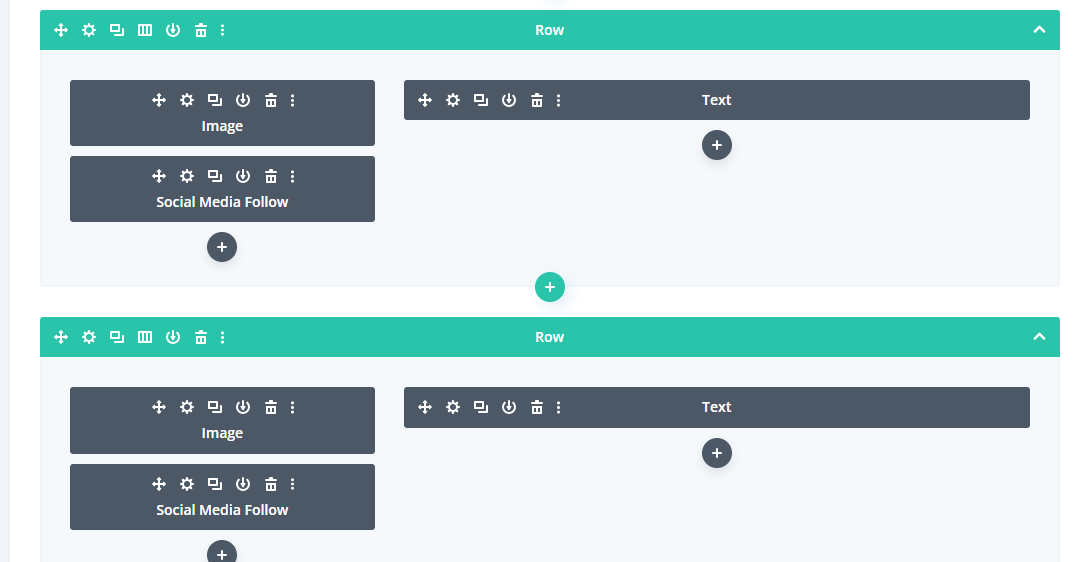
Once you have added and designed the rows and modules you intend to use, open up the first row’s settings then go to the advanced tab, then to the CSS ID & Classes section. Add the class db_row_1 under CSS Class. For the remaining four rows, we’ll be adding two classes, with each row having its own number and a class to initially hide it. Here are the two classes you will add to rows #2 through to #5: db_row_2 hide db_row_3 hide db_row_4 hide db_row_5 hide
The Mobile Version
Create a second section with the images and the rows you created in the desktop version. Remove all the Classes then disable the section on the Desktop so it will only be visible on mobile and tablet. Remove the first 5 columns that have the image modules. Once you are done with this section, save and publish your page, so you can move to the next step, adding CSS and jQuery.
Adding Custom CSS
If you are working with a child theme you can go to Appearance>Editor and open your stylesheet. If not, go to Appearance>Divi Theme Options>Custom CSS Add this CSS:
/*=================================*/
/*=================================*/
/* Hover Over Image To Show Hidden Row */
.db_image_1:hover .et_pb_module_header,
.db_image_2:hover .et_pb_module_header,
.db_image_3:hover .et_pb_module_header,
.db_image_4:hover .et_pb_module_header,
.db_image_5:hover .et_pb_module_header {
color: #3264cf!important;}
.show {
opacity:1!important;
display:block;
transition: 0.3s;}
.hide {
opacity:0!important;
display:none;
transition: 0.3s;}
Pro Tip: How to Add CSS Code Snippets to the Divi Theme
Adding The jQuery Script
Download & unzip this text file to get the jQuery script. Copy and paste the script into the integration box.
And that’s it.
Well, that’s it! We hope you enjoyed reading this tutorial as well as the free assets (Layout, jQuery, and CSS Scripts) we are sharing with you. There are more cool tutorials to come, so please make sure to sign up for our newsletter.
Have fun.


0 Comments